


Orion Motor Tech Ball Joint Press Kit, Heavy Duty Ball Joint Removal Tool Kit with 4x4 Adapters, for Most 2WD and 4WD Cars and Light Trucks
Description
🔩 Get the job done right with Orion Motor Tech!
- TRUSTED BY PROFESSIONALS - Quality components sourced globally for reliability.
- ORGANIZED FOR CONVENIENCE - Includes a heavy-duty carrying case for easy storage.
- EFFORTLESS BALL JOINT SERVICE - Remove press-fit parts without control arm removal.
- PROFESSIONAL GRADE DURABILITY - Built to last with rust-resistant black-oxide finish.
- UNIVERSAL FIT FOR MOST VEHICLES - Compatible with a wide range of 2WD and 4WD models.
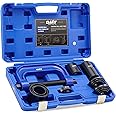
The Orion Motor Tech Ball Joint Press Kit is a heavy-duty tool designed for the effortless removal of press-fit parts in most 2WD and 4WD vehicles. Constructed from high-quality forged steel, this kit includes a variety of adapters and comes organized in a durable carrying case, making it an essential tool for both professional mechanics and DIY enthusiasts.
Specifications
| Manufacturer | Orion Motor Tech |
| Brand | Orion Motor Tech |
| Model | Ball Joint Press Kit |
| Item Weight | 15.84 pounds |
| Product Dimensions | 13.98 x 11.91 x 3.54 inches |
| Country of Origin | China |
| Item model number | 0401RD |
| Is Discontinued By Manufacturer | No |
| Exterior | Polished |
| Manufacturer Part Number | OMTCA BJS-0401-00 |
| OEM Part Number | ball joint kit |
| Safety Rating | None |
Have a Question? See What Others Asked
Reviews
V**N
Great tool, durable and functions as intended.
I used these to replace the upper and lower ball joint on a 2005 Chevrolet Silverado. They came quickly. The weight of the kit is a little heave but that usually a good thing. Everything listed was included in the kit. They did well and as intended to complete the job. They are also a nice addition to have in your tool collection just incase you may need it in the future. Not only did they perform well with this job but I'll be able to use them again myself in the future. They are solid and durable. The case was also nice as it helps protect everything while being stored or transported. They case is also pretty durable hard plastic. The case also helps keep everything in the kit organized as well. If need of a tool for ball joints, or an addition to your toolbox, I definitely recommend this kit. If im in need of another, I'll definitely be a customer again in the future.
R**N
OMT Ball Joint Press Tool kit
I've used this Press tool to remove and install 3 sets of Ball joints on my Dodge Chargers and have had 0 issues. I recommend this set without hesitation. Why did you pick this product vs others?:I chose these because of the brands over all reputation and the price is affordable.
D**R
2010 Silverado OEM Lwr Ball Joints
My experience, yours may vary:2010 Silverado LT 4WD-Couldn't use this to press "out" an OEM lower ball joint @ 150k miles (not a correct size receiving tube). Removed ball joint old school (support lower arm, then heat/spray/wack out). On mine, there isn't a lot of real estate on the underside of lower control arm to fit a receiving tube anyhow, the underside flange on OEM ball joint took up most of surface area. There wasn't a receiving tube in this kit to fit around that flange and still contact the underside of the lower control arm. [ In pic, receiving cup "L" was too small to push lower ball joint through, cup "M" too big ]FWIW, some internet scuttlebutt sites say these devices are more for pressing "in" than pressing "out" the big ball joints, so I was ready/expecting to wack the old joint out anyhow.-As far as pressing "in" the new lwr ball joint:This did the trick installing the new ball joint, worked perfect.
G**Y
Works great
Worked flawlessly on my 02 Explorer Sport Trac. The different combos can get confusing, but apply a bit of critical thinking and an impact wrench and you’ll be good. Affordable and worked as expected.
D**S
Great ball joint press kit
Very impressed with this ball joint press. Used it on a 1997 Jeep Cherokee with original factory ball joints and it work flawlessly pressing them out.
D**S
Great Quality Tool – Made the Job Much Easier
Excellent quality. I used it to replace the ball joints on my Dodge Ram 1500, and it worked perfectly. It made the job much easier and more efficient. Highly recommended.
B**Y
Bent on first use
Bought to remove and reinstall ball joints - the C clamp, while heavy duty, bent on the first uninstall while breaking the ball joint free.
S**N
Ok for normal car use
Used this on a f250 super duty truck which I think is too much for it. Started turning threads. This set is probably ok for normal cars but I wouldn’t use it again on a heavy duty truck.
Common Questions
Trustpilot
2 months ago
1 week ago
